
Manage 2FA and passkeys
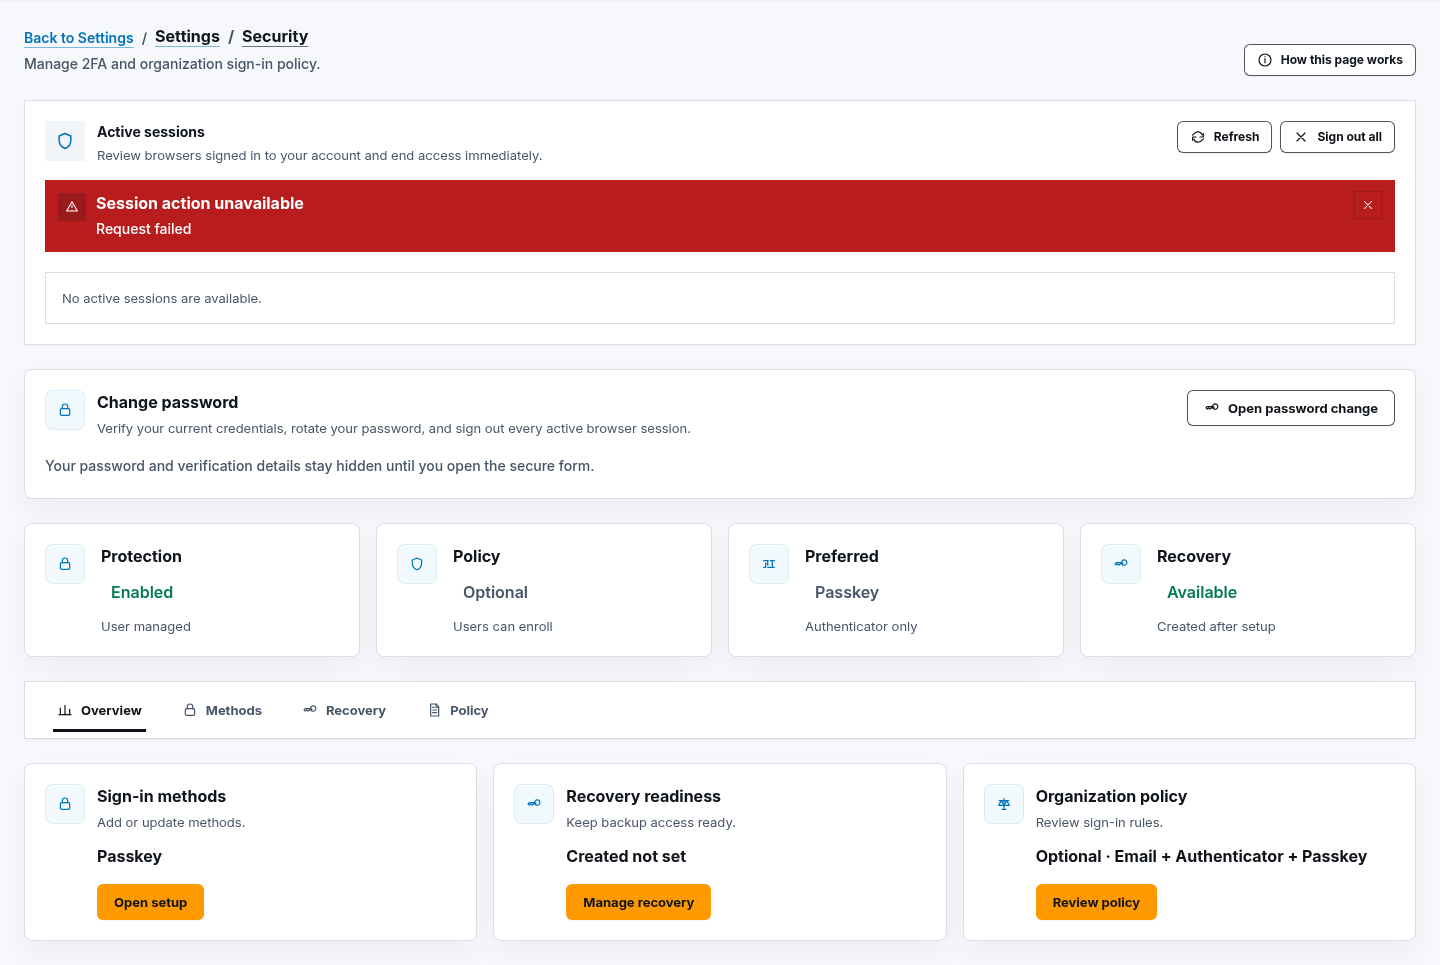
Open Settings, then Security. The security workspace contains Overview, Methods, Recovery, and Policy tabs plus passkey and session controls.
- Typical time
- 10–20 minutes
- You need
- Current password and a trusted device
- Outcome
- Verified sign-in and recovery methods
Review current protection
Section titled “Review current protection”- Review Protection, Policy, Preferred, and Recovery.
- Open Methods to inspect Email codes and Authenticator app.
- Open Recovery to confirm a recovery-code set exists.
- Open Policy to view organization requirements.
- Choose Open setup, Manage recovery, Manage methods, or Review policy only for the action you intend.
Check your result
Section titled “Check your result”The enabled methods, preferred method, recovery readiness, and policy are internally consistent before you change anything.
Enable email codes
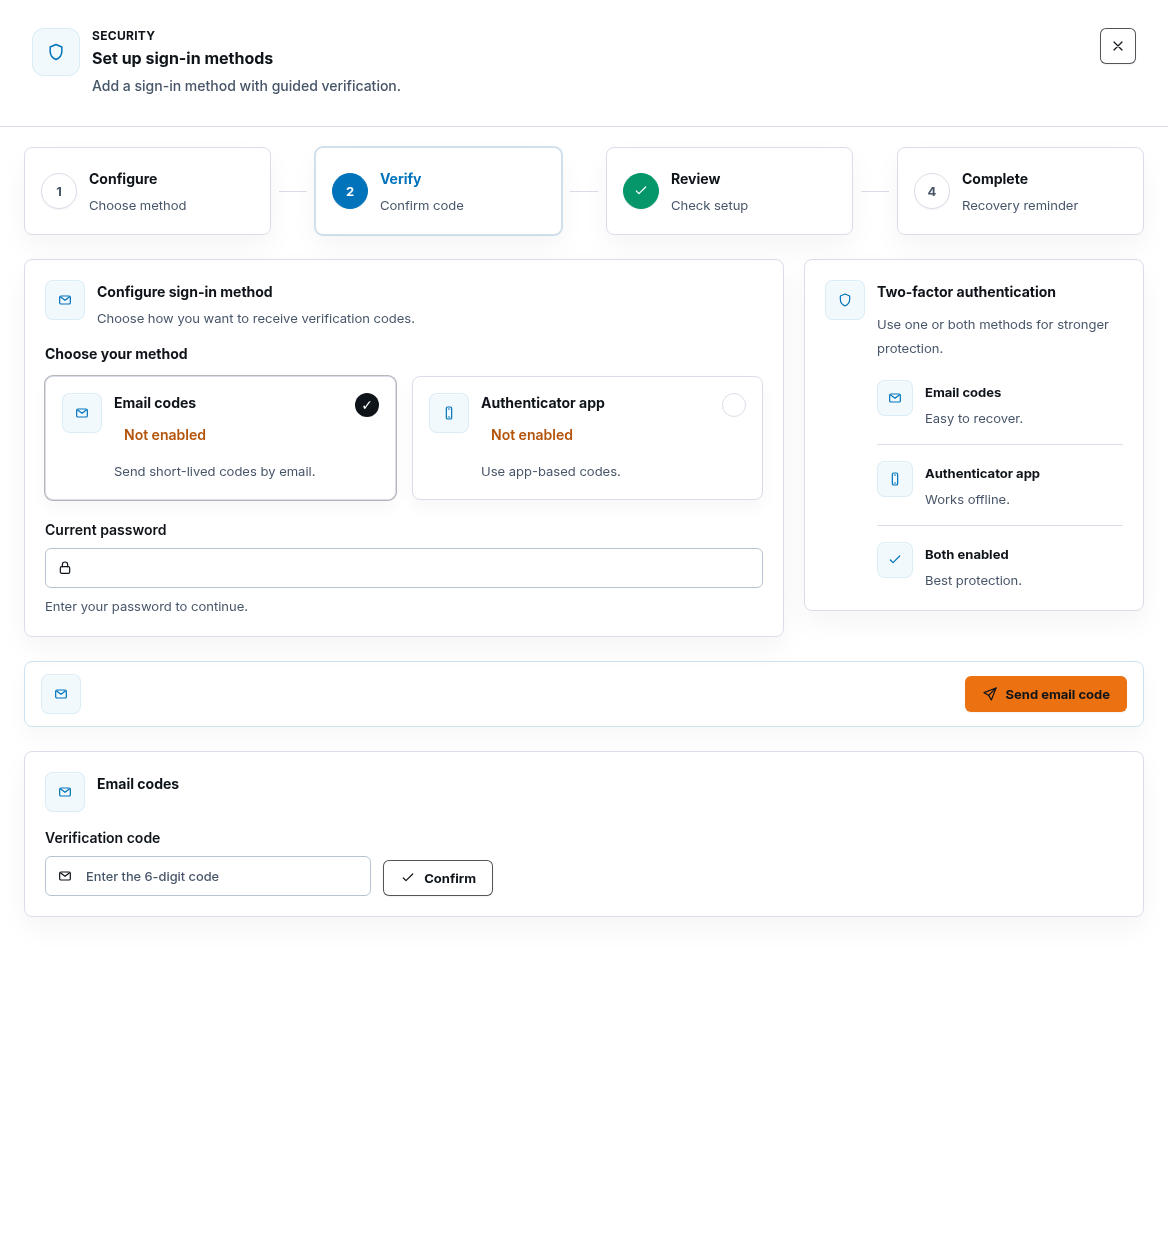
Section titled “Enable email codes”- Choose Open setup.
- In Configure sign-in method, choose Email codes.
- Enter Current password.
- Choose Send email code.
- Enter the six-digit Verification code.
- Choose Confirm.
- Save the newly displayed recovery codes privately if this is the first method.
Enable an authenticator app
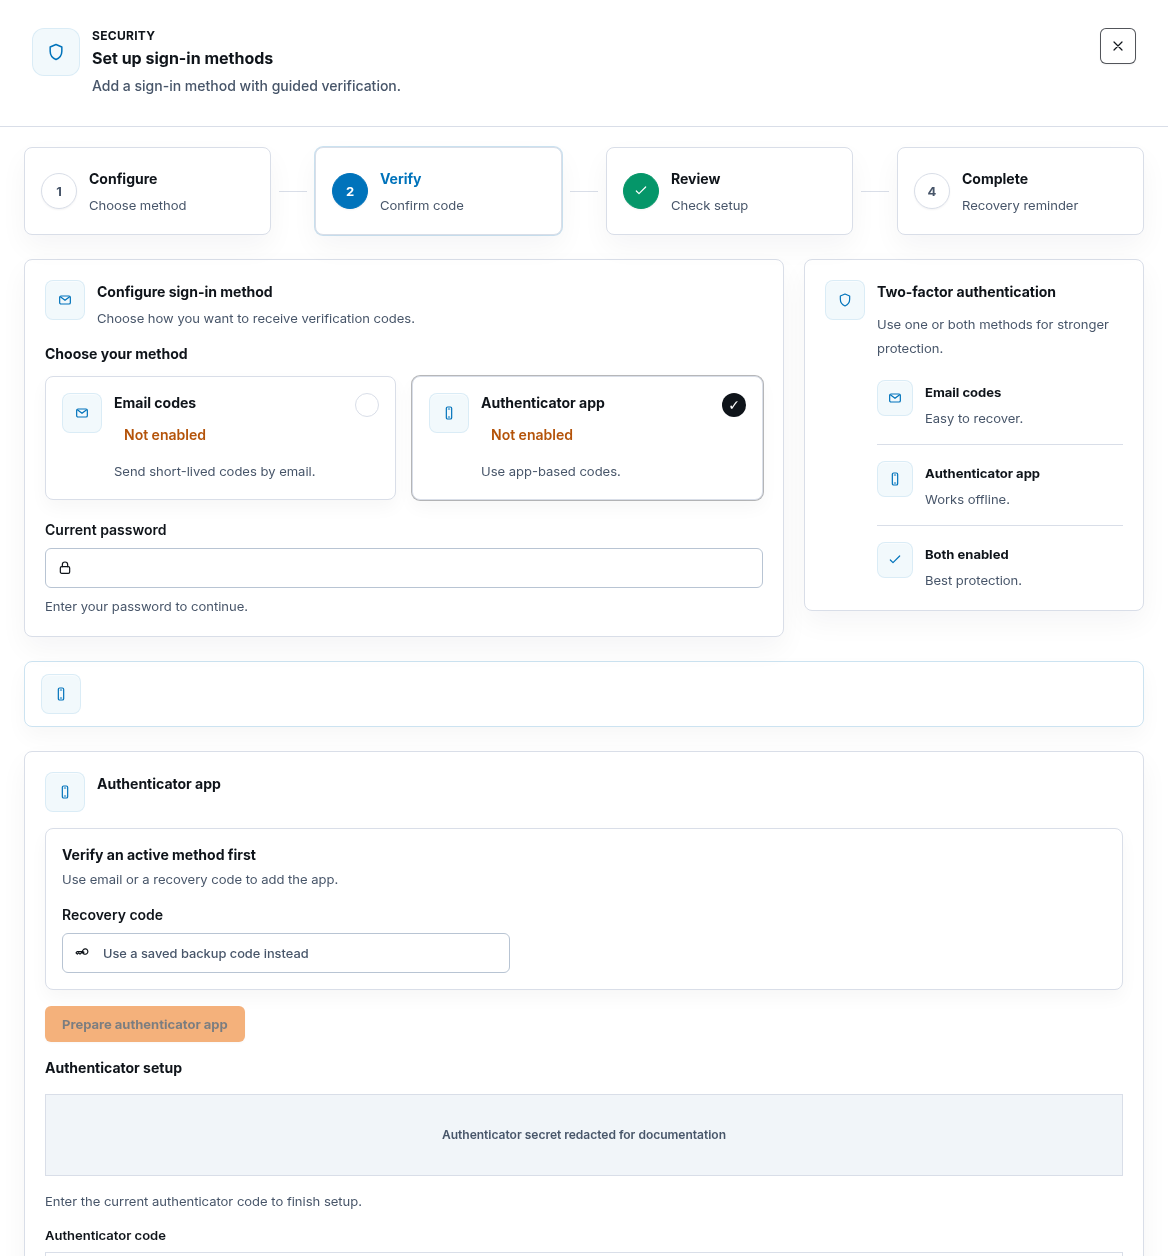
Section titled “Enable an authenticator app”- Choose Authenticator app in Set up sign-in methods.
- Enter Current password.
- If another factor is already active, verify it with Send email code and Confirm, or use a saved Recovery code.
- Choose Prepare authenticator app.
- Scan the QR code or use Copy authenticator app manual key privately.
- Enter the current Authenticator code.
- Choose Confirm.
The QR code, manual key, and otpauth value are secrets. They must be fully
redacted in screenshots.
Check your result
Section titled “Check your result”Authenticator app shows Enabled and the account has recovery codes.
Change preferred method
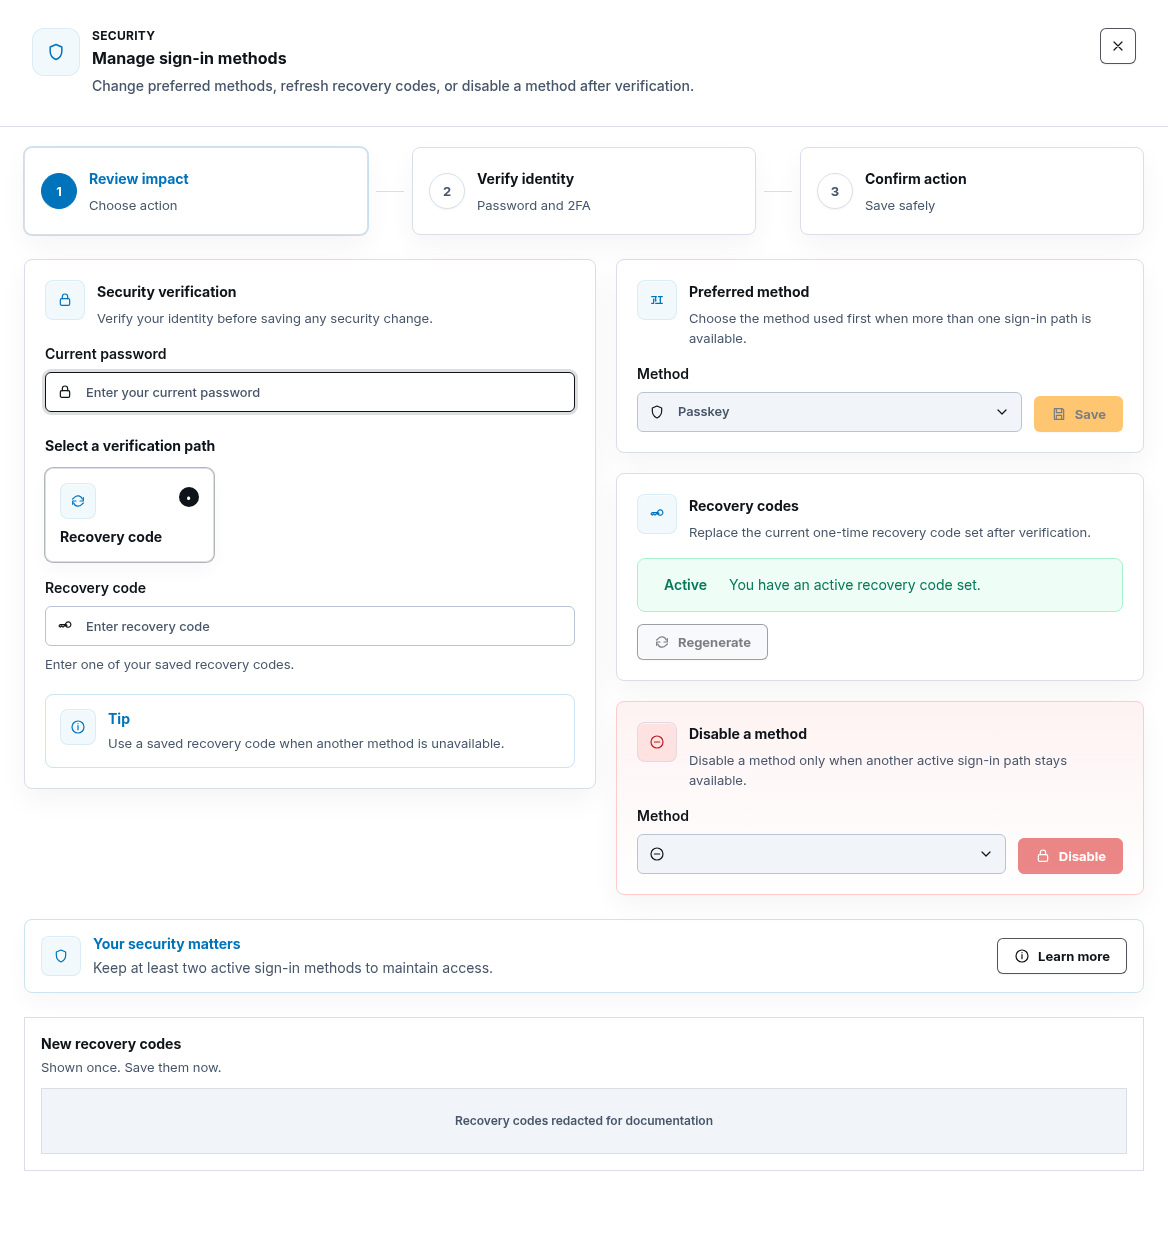
Section titled “Change preferred method”- Choose Manage methods.
- In Security verification, enter Current password.
- Select an offered verification path and complete its authenticator, recovery, or email proof.
- In Preferred method, choose the method.
- Choose Save.
The preferred method is tried first when available; it does not disable other enrolled methods.
Regenerate recovery codes
Section titled “Regenerate recovery codes”- In Manage sign-in methods, complete Security verification.
- In Recovery codes, choose Regenerate.
- Save every value shown under New recovery codes immediately.
- Replace the old stored set; previous codes are no longer reliable.
- Leave the page only after the new set is safely stored.
Recovery codes are shown once. Store them in an approved private password manager or offline recovery process, never in ScrinCloud notes or screenshots.
Disable a method
Section titled “Disable a method”- Confirm another allowed active sign-in path will remain.
- Complete Security verification.
- In Disable a method, choose the method.
- Choose Disable and wait for Disabling….
- Recheck Methods, Preferred, Recovery, and organization policy.
The backend rejects unsafe disable requests, including policy conflicts or removing the last viable method. Do not attempt to bypass that guard.
Add, rename, or revoke a passkey
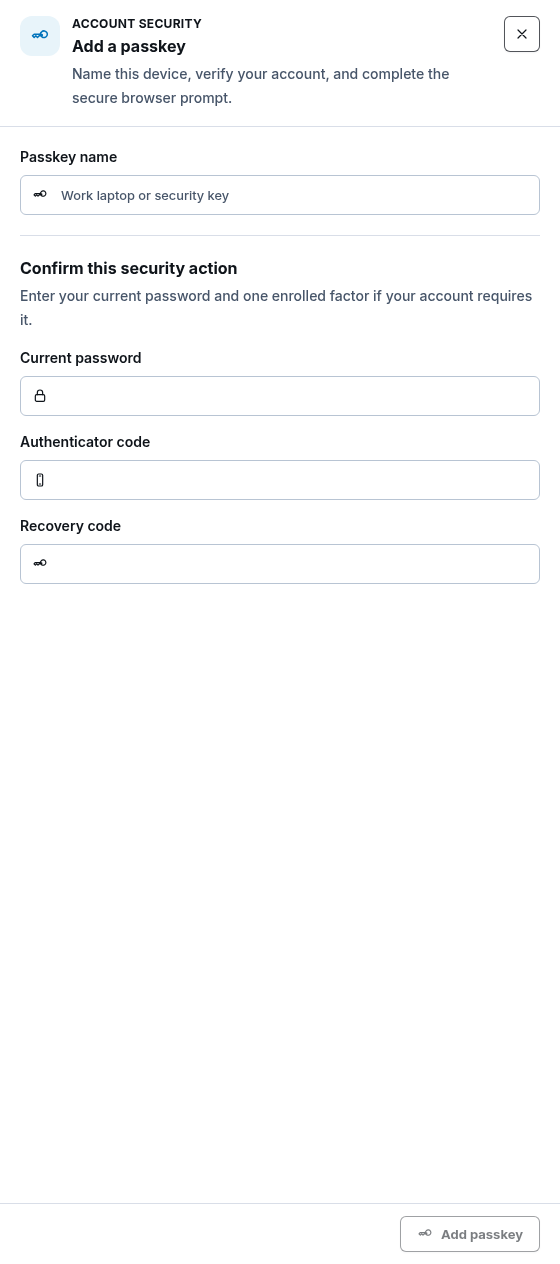
Section titled “Add, rename, or revoke a passkey”- In Passkeys and security keys, choose Add passkey.
- Enter Passkey name and Current password.
- Provide an enrolled Authenticator code or Recovery code when required.
- Choose Add passkey.
- Complete the trusted browser or operating-system prompt.
Rename
Section titled “Rename”- Choose Rename beside the credential.
- Enter New passkey name and the required proof.
- Choose Save name.
Revoke
Section titled “Revoke”- Choose Revoke beside the exact credential.
- Enter required verification and choose Review revoke.
- Review Revoke passkey? and choose Revoke passkey.
Revocation is immediate for that credential and does not change other methods.
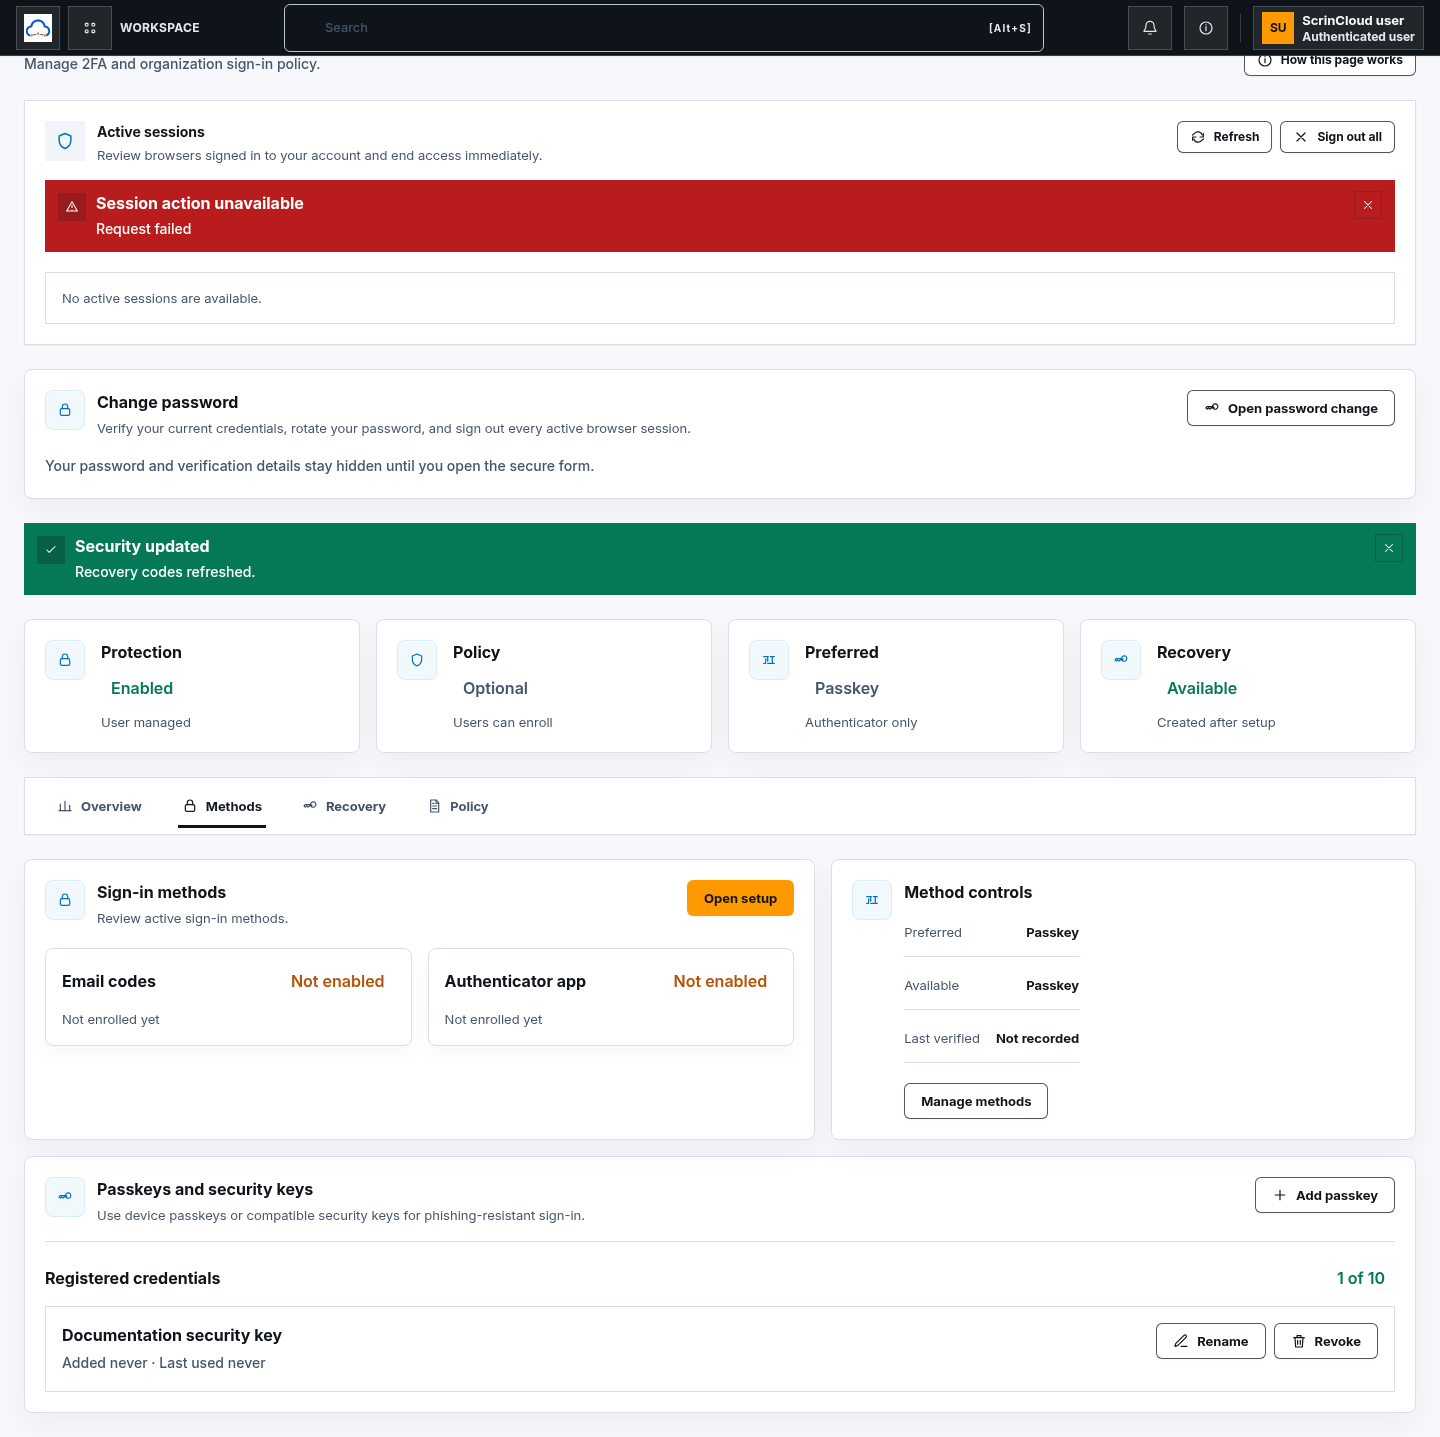
Check your result
Section titled “Check your result”The inventory shows the added or renamed credential, or no longer shows the revoked credential. Test sign-in only from a separate controlled browser; do not sign out your only recovery path prematurely.
Review organization sign-in policy
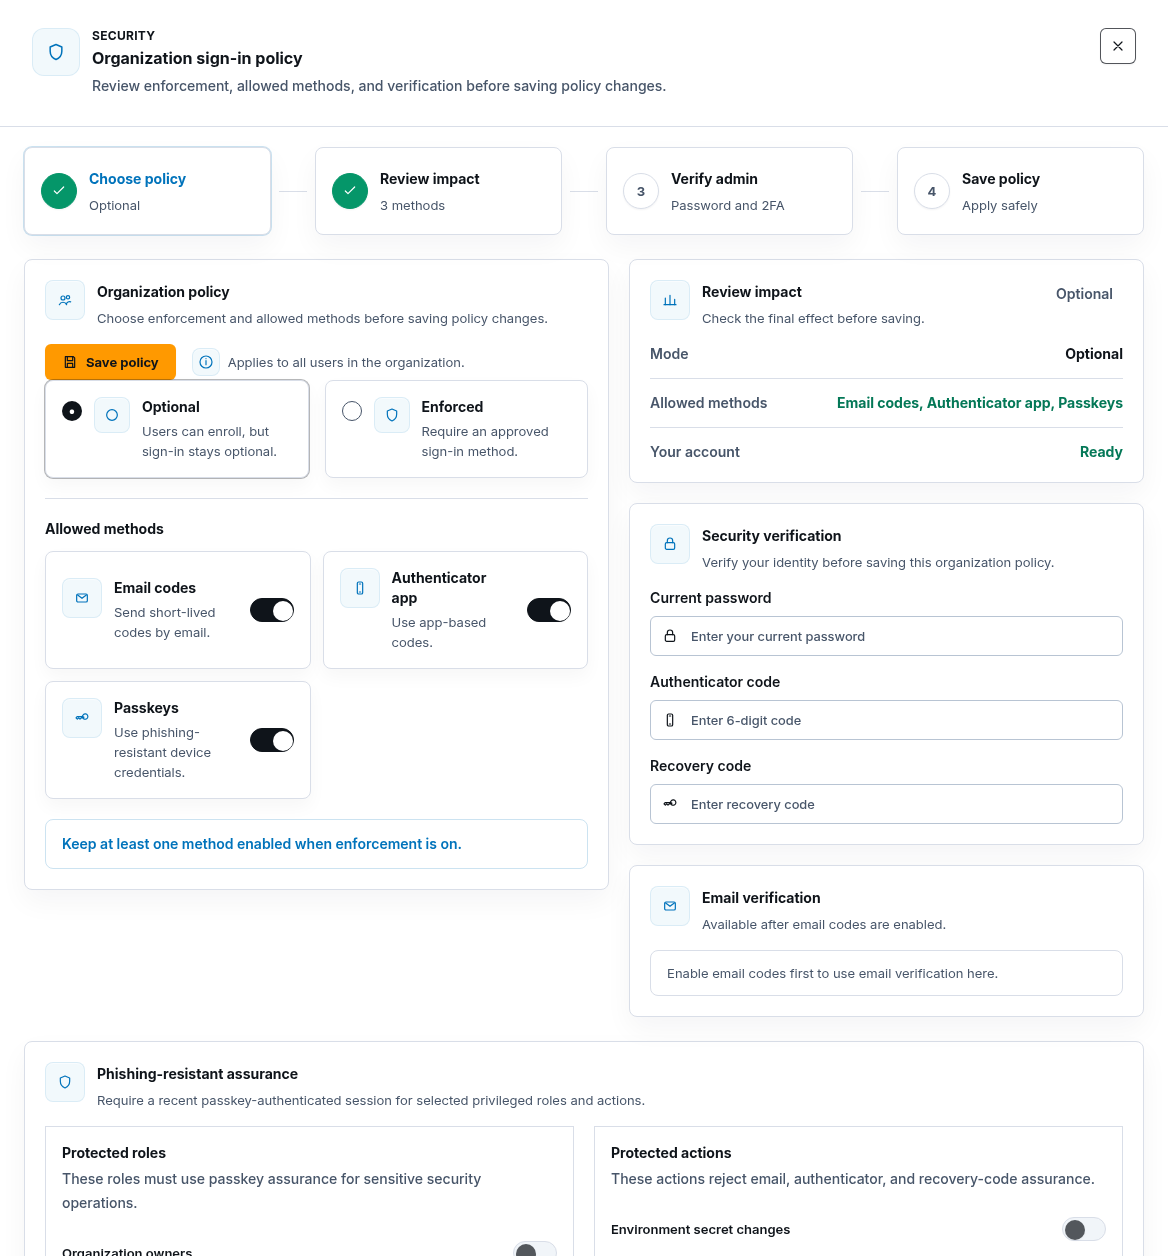
Section titled “Review organization sign-in policy”Authorized organization policy managers can:
- Choose Optional or Enforced.
- Select allowed Email codes, Authenticator app, and Passkeys.
- Review impact.
- Complete Security verification.
- Choose Save policy.
- In Phishing-resistant assurance, choose protected roles and actions, verify again, and choose Save privileged policy.
When enforcement is on, keep at least one allowed method. Protected phishing-resistant actions reject email, authenticator, and recovery assurance when a recent passkey-authenticated session is required.
Confirm the final security state
Section titled “Confirm the final security state”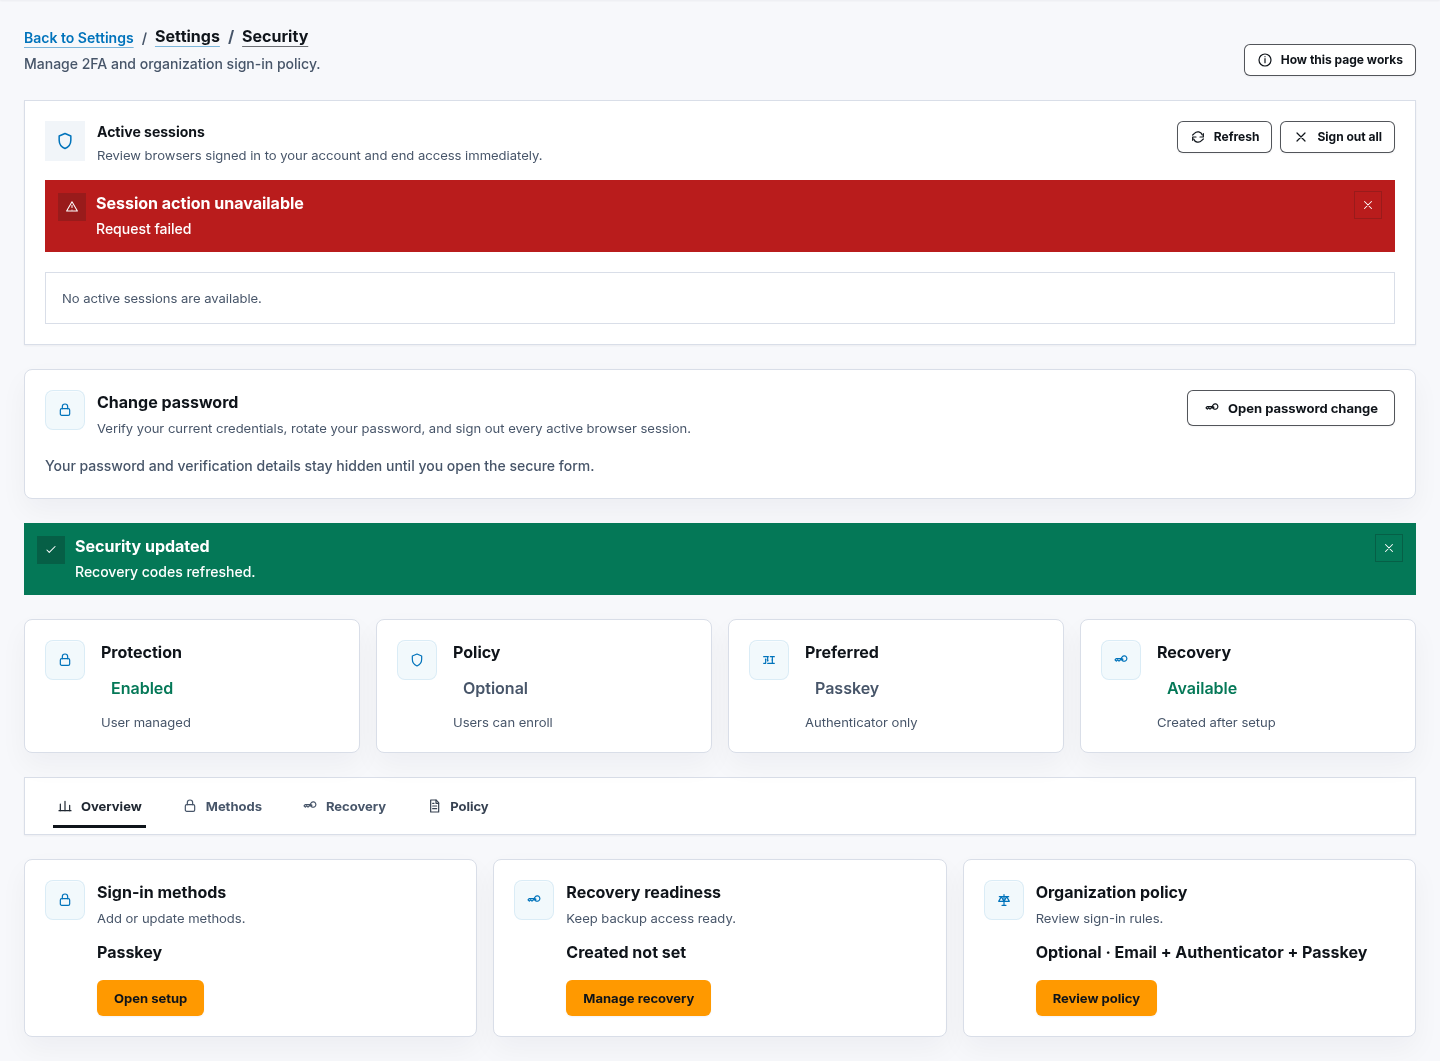
The settings page proves saved account and policy state after refresh. It does not prove every browser, device, or hardware key can authenticate; use a controlled sign-in test without exposing secrets.
Common blockers
Section titled “Common blockers”A method is blocked by policy
Section titled “A method is blocked by policy”Choose an allowed method or ask an authorized organization policy manager to review the requirement. Do not weaken policy solely to finish enrollment.
Existing-factor verification is required
Section titled “Existing-factor verification is required”Use a currently active email, authenticator, recovery, or passkey path as offered. If none is available, use verified identity recovery.
Passkey setup is canceled
Section titled “Passkey setup is canceled”Return to Add passkey and start a fresh browser prompt. Do not reuse a captured credential challenge.
Recovery codes were not saved
Section titled “Recovery codes were not saved”While still authenticated, verify identity and choose Regenerate. The new set replaces the previous set.
Disable would remove the last method
Section titled “Disable would remove the last method”Enable and verify another allowed method first. The fail-closed rejection is expected.