
Set up a workspace
A workspace is the working boundary for one environment, account, region, team, or delivery stream. It connects architecture diagrams, Terraform revisions, provider context, policy checks, plans, and history.
- Typical time
- 10–15 minutes
- You need
- Environment and region
- Next step
- Configure policies
Decide the workspace boundary
Section titled “Decide the workspace boundary”Create separate workspaces when any of these differ:
- development, test, staging, or production environment;
- AWS account or Azure subscription;
- cloud region;
- team ownership;
- source repository or branch;
- approval requirements; or
- deployment schedule.
For a first-time setup, create one non-production workspace. Avoid a single catch-all workspace for unrelated systems.
Prepare your choices
Section titled “Prepare your choices”Have these values ready:
| Choice | What it means |
|---|---|
| Workspace name | A recognizable environment and purpose, such as customer-portal-development |
| Environment | The saved lifecycle boundary used by diagrams and Terraform variables |
| Provider | AWS or Microsoft Azure |
| Region | The approved region for this workspace |
| Cloud account | Optional existing connection for workflows that need provider access |
| Execution type | Manual workspace or a connected Git repository |
| Variables | Non-secret values used by the starter Terraform workspace |
| Tags | Search, ownership, product, or cost labels |
Open Add Workspace
Section titled “Open Add Workspace”- Continue from Add Members, or open the project’s setup progress.
- Select Create Workspaces.
- Confirm the page title is Add Workspace.
- Confirm the progress row shows Workspace details, Environment & provider, Repository & execution, and Review.
If the project already contains workspaces, make sure you are creating a new boundary rather than duplicating an existing environment.
Step 1: Workspace details
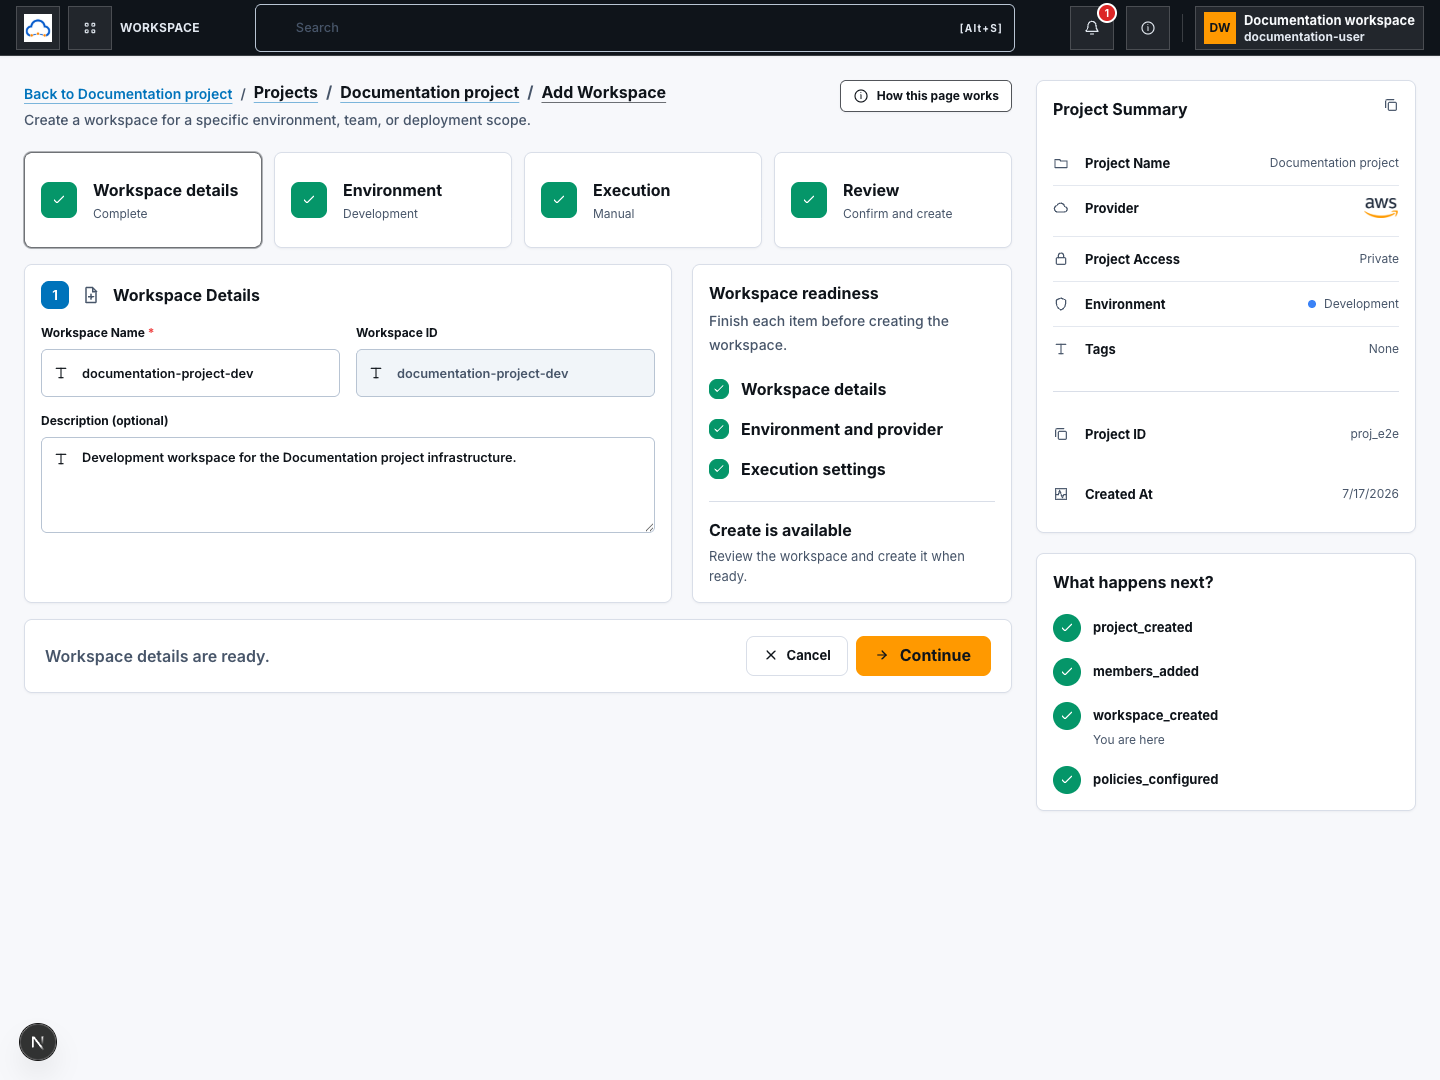
Section titled “Step 1: Workspace details”- Review the suggested Workspace Name.
- Change it to a clear environment-and-purpose name if needed.
- Review the generated, read-only Workspace ID.
- Add a short Description.
- Check Workspace readiness for completed details.
- Choose Continue.
The Workspace ID is derived from the name. Use a stable name because other records and links may refer to the workspace over time.
Check your result
Section titled “Check your result”Workspace readiness shows Workspace details complete, and the generated ID contains letters or numbers.
Step 2: Environment & provider
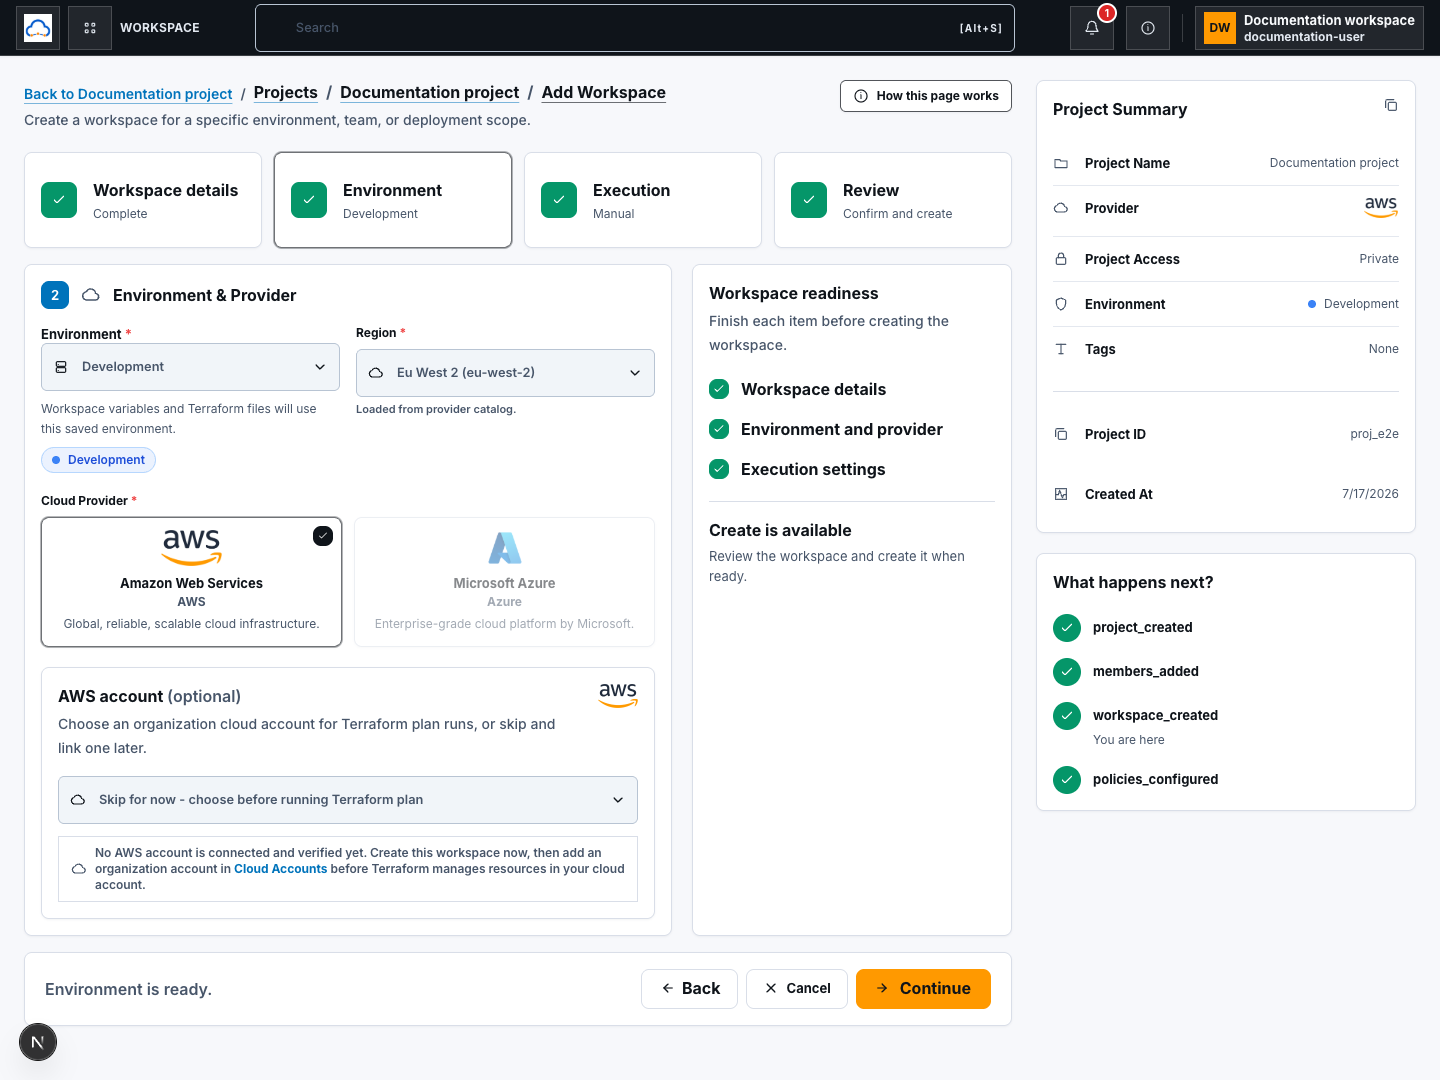
Section titled “Step 2: Environment & provider”- Select the saved Environment for this workspace.
- Select the Region approved for that environment.
- Confirm the Cloud provider.
- Wait for the region catalogue to finish loading.
- Optionally select a cloud account connection.
- Choose Continue.
The provider normally starts with the project default. If you change it, verify that the region and any selected cloud connection also belong to the new provider.
About cloud account connections
Section titled “About cloud account connections”A connection lets approved workflows interact with a real AWS account or Azure subscription. It is optional for visual design and local file review.
- Select a connection only when you recognize its name, provider, scope, and environment.
- The connection should use the smallest permissions required.
- Do not create or paste provider credentials into this form.
- If no suitable connection is available, continue without one or ask an administrator.
Check your result
Section titled “Check your result”Workspace readiness shows Environment and provider complete. The selected environment, provider, and region agree with each other.
Step 3: Repository & execution
Section titled “Step 3: Repository & execution”Choose how this workspace will manage Terraform source.
Option A: Manual workspace
Section titled “Option A: Manual workspace”Use a manual workspace when you want to:
- learn the ScrinCloud workflow;
- generate or import Terraform for review inside the workspace;
- connect Git later; or
- avoid linking a repository during initial setup.
Leave the Git or VCS option disabled. ScrinCloud creates safe starter workspace files without creating cloud resources.
Option B: VCS-driven workspace
Section titled “Option B: VCS-driven workspace”VCS means version control system. In this setup, it refers to a Git-backed workflow. Use a VCS-driven workspace only when an approved repository and Git connection already exist.
- Enable the Git or repository option.
- Select the connected Git account.
- Enter the approved repository URL.
- Enter the branch, usually
mainunless your team specifies another. - Confirm the repository belongs to the expected organization.
Repository and branch become required when VCS execution is enabled.
Variables and tags
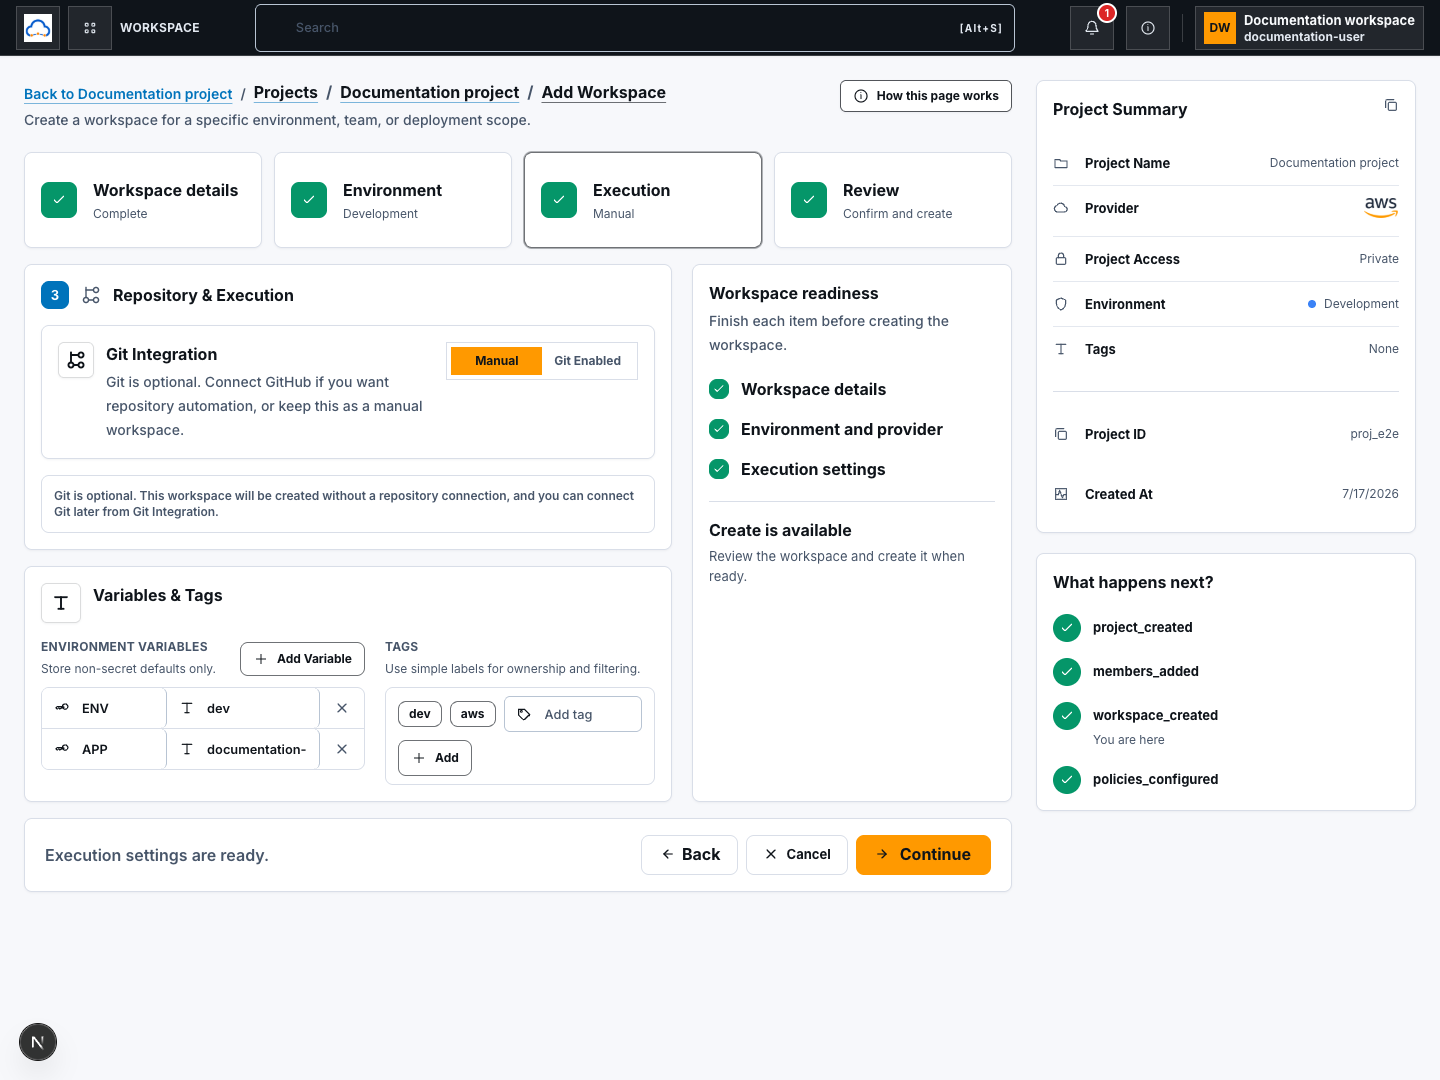
Section titled “Variables and tags”- Review the starter variables such as environment and application name.
- Add only non-secret values.
- Remove variables that do not apply.
- Add search or ownership tags.
- If Allow custom Terraform resources appears, leave it disabled unless your role and organization policy explicitly allow resources outside the approved canvas catalogue.
- Choose Continue.
Check your result
Section titled “Check your result”Workspace readiness shows Execution settings complete. If VCS is enabled, the connected Git account, repository, and branch are all present.
Step 4: Review and create
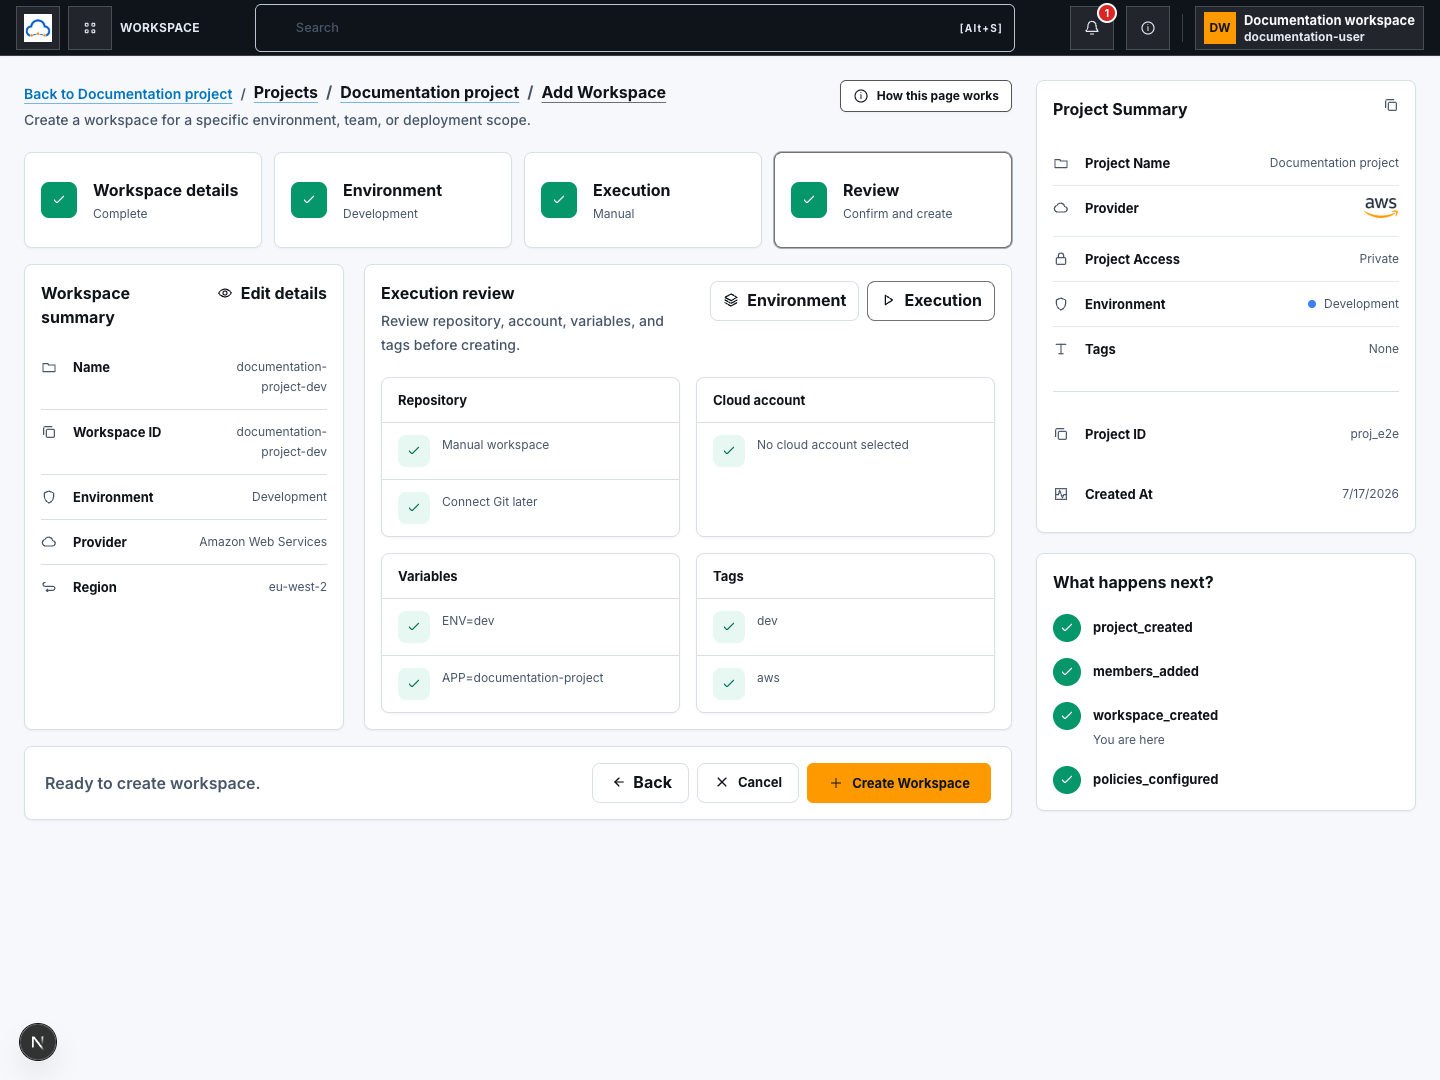
Section titled “Step 4: Review and create”- Review Workspace summary:
- Name
- Workspace ID
- Environment
- Provider
- Region
- Review Execution review:
- Manual or repository-backed source
- Cloud account connection
- Variables
- Tags
- Use the edit actions to correct any mismatch.
- Confirm no secret or customer data appears.
- Choose Create Workspace.
- Wait for the workspace revision and setup status to be saved.
Confirm the workspace was created
Section titled “Confirm the workspace was created”The step succeeded when:
- the setup progress marks Create Workspaces complete;
- the new workspace name is available to the project;
- no workspace creation error is shown; and
- the setup continues to Policy Guardrails or asks where to continue.
Creation saves a Terraform workspace revision. It does not run Terraform and does not deploy infrastructure.
Common blockers
Section titled “Common blockers”Region is unavailable
Section titled “Region is unavailable”Wait for provider regions to load. Confirm the provider first, then select a region supported by your organization. If the catalogue falls back to bundled regions, verify the final choice with your cloud owner.
A cloud connection is missing
Section titled “A cloud connection is missing”Continue without one when the workflow is visual design or local review. For live discovery, plan, or apply workflows, ask an administrator for a least-privilege connection that matches the provider and environment.
Continue is disabled in Repository & execution
Section titled “Continue is disabled in Repository & execution”When Git is enabled, connected Git account, repository URL, and branch are required. Disable Git to create a manual workspace, or complete all three repository fields.
Create Workspace is disabled
Section titled “Create Workspace is disabled”Read the reason in Workspace readiness. The required groups are:
- valid workspace details;
- environment, provider, and region; and
- complete execution settings.
The workspace already exists
Section titled “The workspace already exists”Return to the project and open the existing workspace. Do not create a second workspace with a slightly different spelling to bypass an ownership or state conflict.
Continue
Section titled “Continue”Policies can be saved as a draft earlier, but applying project policy guardrails requires an active workspace. Continue with Configure policy guardrails.